Saturday, April 6, 2013

Stairs, lights, and rugs - oh my!

While I was out of town on a shopping trip with my sister, Chris got stairs up! They’ve got the construction treads on them still as we don’t have the wood cut for the finished treads, but oh! How awesome to be able to carry boxes up and down stairs instead of a ladder. It’s the little things in life, ya know?


One stringer up and starting the landing

And we have stairs!

Future closet under stairs
The cat loves them by the way. She’s going to be very disappointed when we put the back on them. We won’t leave them open simply because we need the storage space and that’s a very deep closet-to-be. Too bad, as I kind of like the look. But when you build on a slab and give up all that awesome basement storage, you quickly realize that inside storage is at a premium.


Cat staring through stairs - her new favorite activity
Some other stuff that we’ve been up to:

Put shelves in the freezer storage closet off the pantry. So I’m making great progress in unpacking all my cooking gear.


Shelves to left go all the way to floor
Set up a new chrome shelving unit in the kitchen that’s much prettier than the plastic one we had there. Plus it’s bigger – useful and good looking! The other storage units are being set up in the future upstairs bathroom which is going to be a temporary storage space.

Easy assembly

All filled up
Put up a new kitchen light in the middle of the room. Went down to IKEA to buy some functional/pretty stuff like living room rugs and the aforementioned light. Okay, I managed to buy some other stuff too, but since they’re not installed yet, you’ll just have to wait for another post.


A very subtle new light

Not so subtle rugs
 And here's a sneak peak at our bathroom sink design:

Sink parts
 Makes a lot more sense when it's assembled...

Rough assembly
We dry-fitted it to make sure we liked it and to make sure we had all the pieces we needed. Turns out we needed some unions that would allow the last pipes fit together properly. So the test run was a success in that it pointed out we needed to do a bit more work. The sink is white porcelain and will sit in the center; on either side will be a slab of wood that we finish with a marine varnish for durability. I think it's going to look awesome.


We’re also doing road maintenance. Mud season is upon us and we’ve sustained quite a bit of damage from truck traffic. So the road needs to be smoothed and new fill brought in. We’re also going to put down some landscaping fabric (or something similar) to help create a water barrier.


They're even worse than they look here
 So that’s latest. Spring is finally coming and all the outdoor tasks start as well. Looking forward to doing some light gardening and building a stone patio.


Friday, April 5, 2013

Time to tile

The first room that we want to have fully finished is the downstairs bath. We’ve been working on all kinds of temporary rooms – more for function than form if you know what I mean. And we’ve been doing really well with that, but at some point you have to actually start finishing rooms and we figured this would be the best place to start.


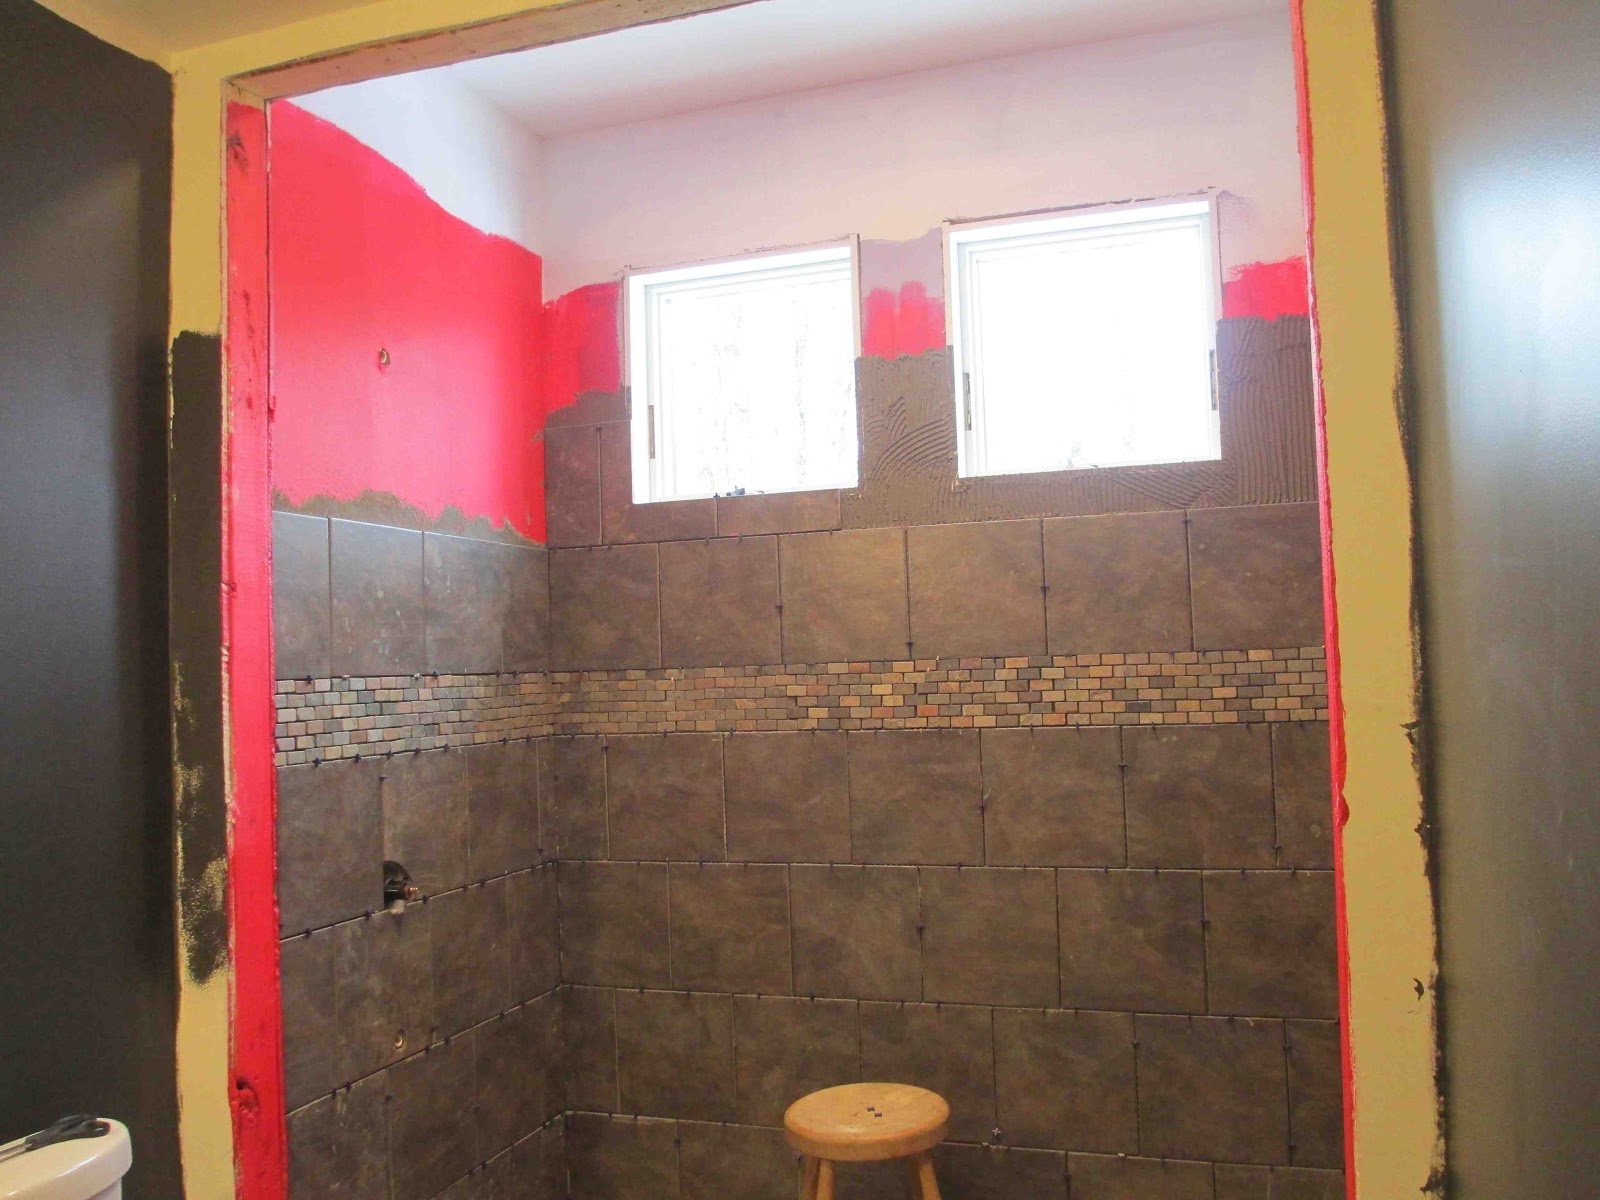
We poured the shower pan and let it cure. Then we started laying the mosaic stone tiles for the floor.  That went quickly and we were done with that step in a few hours. The floor tile went down much easier than we feared although it was a bit of a pain to cut the slate simply because the tiles were so small. We used nippers and a tile scorer to do the cuts at first but ultimately found that the tile saw worked best. Just had to be really careful with those itty-bitty tiles.


Love the stone!

Once the floor was down we needed to let it set for 24 hours before walking on it and took the opportunity to visit with friends up at their sugar bush. Maple syrup is awesome and if you knew how much work went into making it you would realize that the price on the bottle is cheap! Wow, what a lot of effort. While there we got a photo of this little guy. A young weasel grabbing a fresh caught meal. Couldn’t believe the luck in capturing this picture!


When we got back we tackled the wall tiles. Took a bit of planning as the floor was uneven due to the varying thickness of the stone. We finally got the first course laid and then it went very quickly. Working with 12-inch squares is really nice (our last tile job was subway tiles and those take forever to lay out). We had planned what the shower would look like: floor, tiles, mosaic border, tiles up to ceiling. But as we worked our way up, we realized that we had some different ideas that might look better than the original plan. This is what’s nice about DIY –you can change your mind mid-stream. Of course that’s also what’s horrible about DIY…


Working up the wall

The large tiles are porcelain while the floor is real stone

May have to keep the stool in there...

Painters tape provided make-shift support

Finished edge inside shower stall

Still like the stool
Anyway, we made some design decisions on the fly and we’re very pleased with the end result. The tile is laid and setting. We’ll tackle grout next and then the finish work around the windows and walls. It’s coming together really well and we’re far enough along now that we can make additional decorating choices about other parts of the room. Cool! 


Thursday, March 21, 2013

Signs of civilization

I'm borrowing internet from my Dad's house - he just got satellite internet so we decided to try it out. Very nice! Haven't tried to download movies or anything, but normal usage seems to be just fine. We had a technician out to our place today to see what we needed to do to get a clear view of orbit - the answer? Cut a bunch of trees. Fortunately they are trees that were destined for the ax anyway. But it does mean they'll need to come down a bit sooner than planned.

In the meantime we continue to unpack and get organized. We're not decorating yet, nor are we worrying about finishing any rooms (other than the bathroom). We prefer to concentrate on one room at a time, but quickly realized that with everything spread all over it just wasn't going to work. So we're civilizing...

Living room is livable
 The wood stove does a great job of warming the floor and the cat loves it.
Ahhh 
We set up the mudroom even though it's not painted yet. Better to have floor space and places to hang coats than to worry about painting. We'll do that when it's that room's turn.
The mudroom entry
 Back in the day we purchased an old hotel key cabinet. It now stores our keys and looks pretty cool in the mudroom.
Oneonta Hotel key rack
 On Monday we walked to the mailbox on a clear road. This was the view Tuesday evening. We got well over a foot of snow in less than 24 hours. Argh!

Never park the car near the roofline...

Wednesday, March 20, 2013

Downstairs bathroom

The downstairs bathroom has a 4 x 6 shower area that will also hold a soaking tub. I wanted the option of removing the tub sometime in the future so we decided to pour and tile a shower area.

Chris created a sill by framing and pouring concrete. He added some rebar to help with strength. You can see the small slate tiles that we picked for the floor too.

Beginning the form
We used mortar mix to create the pan. Chris shot a laser line to get the slope right and then I smooshed and mooshed the cement in place.
Like playing in the sand
 It took seven and a half bags of cement but it's all done and is now curing. We'll let it dry for about a week while we work on other projects then apply a waterproof sealant. After that we'll put down floor tile and then start the walls.

Semi-finished shower pan
So much happening! A good mix of building, unpacking, decorating, and a bit of relaxing makes for really good sleep at night.


Thursday, March 7, 2013

Solar hot water

So we decided to install a solar hot water system. And here it is! We used Apex Solar, located in Glens Falls. They did a very nice and professional job. They happily worked with us on system design - both size and placement - and took our concerns about looks just as seriously as our performance requirements.

I'm going to attempt to explain how it works, but keep in mind that I'm an accountant - not an engineer. Or plumber.

Roof brackets
We needed three sections of tubes to support our household needs (some folks need four).
Had to straddle the chimney


The vacuum tubes are two layers of glass with a copper tube in the center. The copper tube is filled with "magic gas" with converts from a liquid to gaseous state thus creating heat. This heat transfers to the water that is flowing through the top pipe (the one that runs up through the roof, across the top, and then back down through the roof, moving left to right in the picture below). Since the only water in the system is in that one pipe (remember the tubes hold a gas, not water), the system is amazingly light weight. Each tube is independent so if one tube gets broken for some reason (a tree limb, a baseball), it doesn't shut down the whole system.

Installing individual tubes
The water that flows through the roof-mounted pipe never enters the domestic water system. It is only in the small upper tank that is connected to the control unit / heat exchanger. If the weather is freezing and dark (for instance, February at night) then the water cycles back into the small tank in the house and cannot freeze. When the roof temperature climbs because of sunshine, the water cycles back up and gets heated.

The heat is transferred to the domestic hot water tank until the two tanks reach the same temperatures. Yesterday, a mildly sunny day, the water reached 140 degrees by mid-morning. If the DHW tank temperature cools too much, the system starts up again and rewarms it. Before anyone freaks out about how hot the tank water is, there is a mixing valve that adds cold water before it is used in the household. This is a required anti-scalding measure.

The control unit with heat exchanger  hidden inside

Close up of the tubes
The whole thing is surprisingly subtle up there. You can't even see it unless you're in the Southeast section of the yard. Pretty cool
Normal view

Wednesday, March 6, 2013

Photo update!

I promised a photo update in the cat-woke-me-up post. And here I am, fulfilling my promise. But first, a photo of the rotten-one herself. Doesn't she look innocent? She loves the new house as it has many places to hide and jump out of as well as things to run around, over, and through. She has not asked to go outside since we got here - extremely unusual for this wild kitty.

Taking a snooze of her favorite rug
This is one of the cracker jar lights that I stenciled and frosted. They look great although it's really hard to get a good photo. Either you see the bulb too easily or the frosting whites out. In real life, they are subtly obvious - an oxymoron I know.

Cracker jar light
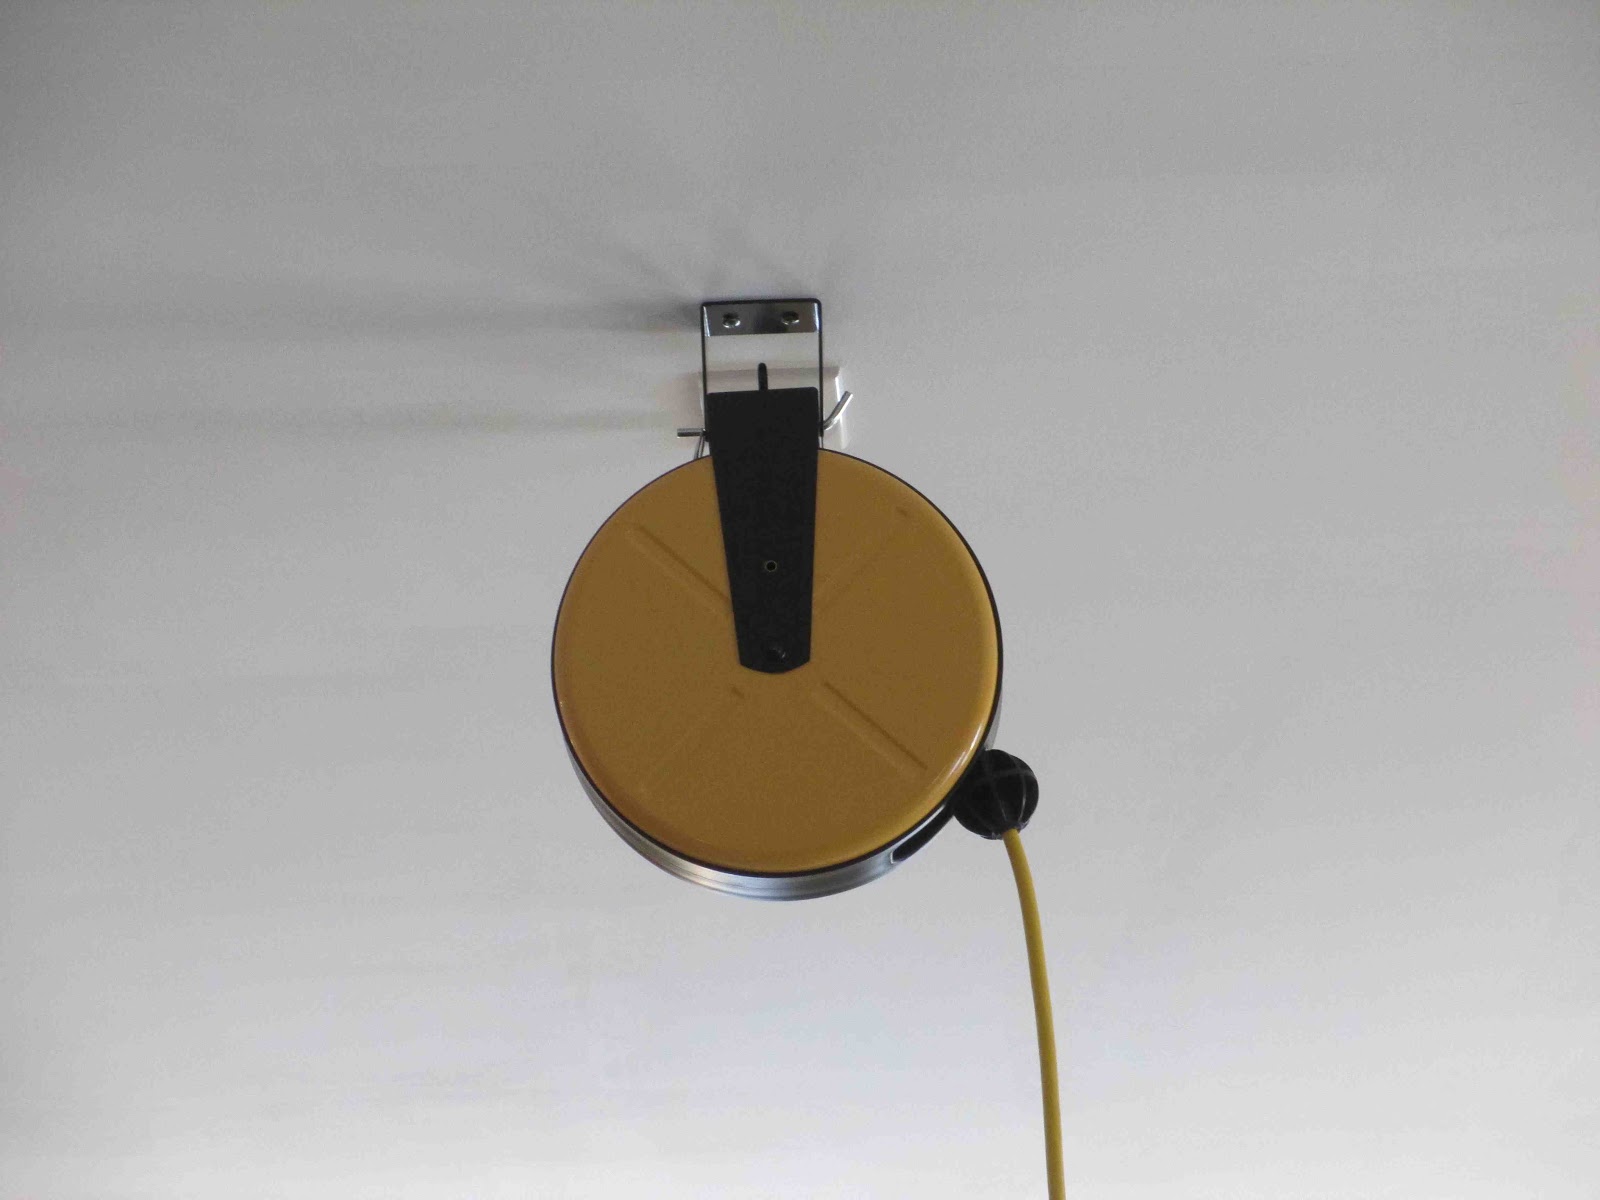
 To get power to the future island we opted not to run conduit through the slab. I didn't want an outlet in the middle of the floor in case I changed my mind about having an island. But I very badly wanted the ability to have power there. So we put an outlet in the ceiling - but how do you reach it to plug in your mixer? You buy a retractable cord reel of course.

Retractable cord reel
It fits perfectly with my "industrial farmhouse" esthetic. Or it will once I actually decorate enough to have an industrial farmhouse esthetic...

You can adjust the amount of cord hanging down too
You just reach up and grab the cord, pull it down to plug in your stuff, and then give it a tug to retract it when you're done.

This is one of the lights I got from Habitat for Humanity Restore. It's awesome. A large flush mount ceiling light rewired by my awesome electricians.

Metal, glass, and cast ceramic
 It holds four CFL bulbs and glows a wonderful golden tone. I was going to dry paint the metal to highlight the detailing but I don't think I need to now. I do need to do something with the finial. Maybe the same color as the wall? I know I don't want it dark but I'm not thrilled with the grungy cream color that's on it now. Huh. I'll come up with something.

Look at that detail!

Monday, March 4, 2013

Off line for a bit

With the sale of the Troy house, our wonderful high-speed internet goes bye-bye. We have no internet service at the new house as of yet. I'm working on getting satellite but that will take a little while to get set up and installed. So no worries if I go dark for a while - I'll be back as soon as I can to update on:

The solar hot water system
Satellite internet
Installation of the indoor flush toilet (oh my God - did life just get better or what???)
The temporary kitchen

And all the other stuff that goes into making the house our home.