Wednesday, February 28, 2018

Recovering my boots

I don't mean recover as in they were lost and now I've found them again. I mean recover like "they look like crap and I need to cover them up with something".

Back when Chris and I rode motorcycles I had a pair of boots that I loved. These things were worn over a lot of miles which means they saw rain, sun, bugs & rocks at 75 mph (ahem, honest officer, that's how fast we were going), and walks through lovely towns and muddy fields alike. They were looking kinda ragged is what I'm saying.

It took me a while to figure out what I wanted to do with them. I bought a leather coat from the local thrift store with the idea of using that as my covering but then decided to use a felted wool sweater instead. I hoped it would stretch over the square toe of the boot more easily than other things I'd considered.

First I wrapped them in plastic and then in masking tape to create a form. Sketched the pattern and then carefully cut it away from the boot.
Saran-wrapped boots
Drawing the pattern pieces
Cut free
Cut out and flattened
I roughed up the boot (even more than it already was), cleaned it well, and then started gluing on the pieces. Rubber bands and office clips helped hold the wool in place until the glue cured.
Improvised clamps
Once cured, I very carefully trimmed the wool away into the design I had originally drawn (more or less).
Front face and heel attached
I actually really liked the "spat" look of the front face and heel but the toe area was in the worst shape so I had to keep going and cover it too.

I ended up putting a notch in the wool to help it stretch over the curve of the ankle area. Then I decided I liked the look and kept the notch rather than trimming it off.
One down, one to go
Finished! 
In their natural habitat
I like how they turned out. And as an added bonus, the wool is surprisingly warm. I've worn them out and about, in rain and snow and ice, and they're holding up well so far.

Monday, February 26, 2018

Another bathroom update

We finished grouting the floor with the charcoal colored grout. This makes a huge mess when you do it, but boy, is it worth it as it really makes the penny tiles pop. And we love how the tile rug came out.
Grouting in action.
Once the grout was dry and we'd sealed both the shower and the floor, we re-installed the toilet and got to work figuring out the vanity and sink situation. As suspected the sink that we owned (a reclaimed wall-mount sink that we got for free during a demolition) wasn't going to work with the cabinet that we also already owned (an old country sideboard that I'd gotten from my Mom ages ago). Since I really wanted to use the sideboard as the vanity we went ahead and bought a new sink. Sometimes shopping the house works, sometimes it needs a little help,  you know?

Chris is going to have to rebuild the sideboard as it's in really bad shape. In fact, it's kinda falling apart in a disturbingly well nailed way. But we should be able to keep the cool old paint and won't have to adjust the height. Drawers will end up being trimmed to accommodate plumbing pipes, but that should be fairly straight-forward (says the person who doesn't have to do it).
The sideboard - and a look at the grouted floor 
Let the deconstruction begin!
So he's going to be working on that and I'll be looking at towel hooks, trim molding, and that kind of stuff. This turned out to a be a perfect winter project.

Sunday, February 25, 2018

What the game camera caught

Our resident fox. Probably the same one that ate four of my chickens. Argh.

Still he's beautiful isn't he?


Saturday, February 24, 2018

Wait - a February thaw???

It's been weirdly warm this February. And a sunny day was the perfect opportunity to refill the wood rack.
Yes, that's a t-shirt he's wearing
In fact, it was so warm we took the opportunity to open up the house for a mid-winter airing out. Didn't even have a fire going.
Open door policy
 The birds got some housekeeping too - the feeder was cleaned and refilled.
Yup, still a t-shirt. 
Two days of mid-50s and mid-60s weather. And a full day of rain. The snow in the woods is quite packed but still deep (if you fall through you're up to your knees) but the driveway is pretty much clear and the road is getting sloppy.

Saturday, February 10, 2018

Making progress on the upstairs bathroom

Shortly after posting about planning the upstairs bathroom we actually got started working on it. Using blue tape we laid out walls, shower pan, and even a tile rug. We were ready!
Taped out walls for storage area and towel hooks over vent
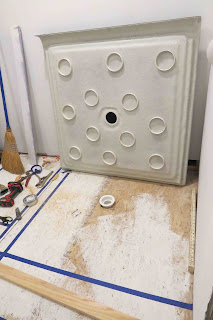
Making sure the drain was in the right spot
Given that we'd plumbed this spot 5 years ago, I think we did pretty darn good placing the drain.
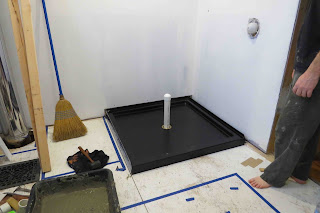
Okay, whew!
First up was setting the shower pan in a mortar bed. The floor was level so it was just a matter of gooping down the mortar and firmly placing the pan in it.

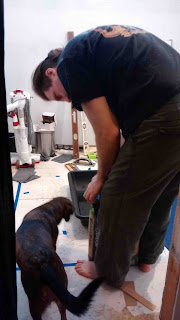
Cooper is always a help
Yup, still helping 
Goop, goop
Apparently I didn't take any pictures of setting the pan in place. Probably because I was helping to place it instead of snapping pics. And then Chris got busy building the walls to enclose the triple-wall stove pipe, the towel area, and the storage closet.

Walls!
In the process we realized that the storage closet was now more of a nook. A niche. A wee small space that wasn't going fit much. Shoot. The hook area to the right was awesome though - right over the heat vent. Nice!
Wait - how wide is it now?
So we're going to get creative with the storage nook. Most likely it'll be a deep cupboard on the bottom and open storage shelves above. I'm sure we'll come up with something handy. Chris is thinking about one of those pull out storage units that would make great use of how deep the area is (it's 30 inches deep but only 17 inches wide). That process is on the back burner until the room is tiled though.

After drywalling and mudding, we painted. That went wicked fast in a room this small. Then we set up Dad's tile saw, prepped our stuff, and started tiling the shower stall.
Painted, prepped, and ready to tile
 That took a few days but came out great.
Ta-dah!
Grouting took a bit of elbow grease (and some roughed up fingers). We used a charcoal gray grout to emphasize the grout lines. We'd done this in our previous house and loved the look.
Wiping this off took forever
The it was time to start the floor tile. First we laid down a layer of Ditra.
That was quick!
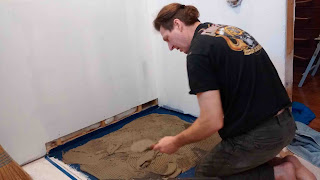
Then we dry-laid the penny tile sheets we'd bought. I wanted a rug design in the sea of white tiles so we bought one sheet of black penny tile and then laid out a pattern I liked. We used blue tape and a dry-erase marker to lay out the design and mark the tiles.
Dry laid to test the pattern
Then we numbered tile sheets so we could place them back in the boxes, ready to be used the next day. If you're contemplating doing something like this I strongly recommend a good night's sleep in between the design and implementation stages. Let it sink in a bit - we ended up changing how we laid out the tiles when we realized that we were going to be fighting placement lines.
Laid out and numbered
To solve that we dry-laid again, and moved the tape & marks to accommodate a staggered sheet placement. Then the tiles were again picked up and put in boxes. When we started tiling it was easy to pull out the tile I needed, pluck out the white tiles where marked, and replace them with black tiles to create rug. No thinking about pattern so I could instead concentrate on getting the sheet in the right place.
This went surprisingly fast
We only laid one section and we'll let it set before doing the edges of the room. Why didn't we start in the far corner and work our way out? Because the rug needed to be positioned properly against the shower edge and door. Since that was our most critical area, it got done first. It won't be a big deal to finish off the other sections next.
Coming right along
After the tile sets we'll grout (again with charcoal gray). Still tons to do after that - trim, pocket door, sink cabinet, fixtures, storage, etc, etc, etc.