This squash was much smaller than I'd realized, at least compared to the 24 pound monster that came before.
Only 16 lbs 13 oz. Which, really, is still pretty darn big.
Same method as before: break it up, remove the guts, roast at 375, this time for 2 hours rather than one hour 45 minutes, and then puree.
Here are the stats:
Whole squash = 269 oz
Innards, butt, and stem = 41.25 oz
Finished puree = 8 bags at 15 oz each = 120 oz
As expected, with additional roasting I lost more water weight so the yield dropped. But the flavor! Got a bit more intense I admit and I think it will make awesome pies/bread/etc.
In other squash news, I also used some of my cooked, cubed, and frozen butternut to make squash cake. I found the recipe while rabbiting around trying to find ways to use the squash bonanza gifted by the garden and I gotta say, it's awesome. Use all the spices that are "optional". They really add to the complexity of the flavor. I did reduce a few of them to suit my personal tastes, but even the pepper added something nice.
Tuesday, November 27, 2018
Thursday, November 22, 2018
And then I made pie
The next step in the great Hubbard Squash experiment was traditional pumpkin pie. I used the Libby's pie recipe since that what I've always used in the past. Since I didn't have a can of their pumpkin puree I found the recipe on their website. Easy.
And then I made the pie.
 |
| Truly excellent Hubbard squash pie. Really. |
And it came out fantastic. Very light textured and great flavor. Chris and Dad both loved it. So I'm an official convert to the school of Hubbard. Long live the squash.
And here's a picture of the squash bread. See the dark caramelization at the sides? Fortunately it still tasted great and I'll make an adjustment or two when I bake to solve the issue.
 |
| Yum |
Wednesday, November 21, 2018
Wrapping up the garden & working on the pit greenhouse
The final tally:
Hubbard squash - 3
Butternut squash - 8
Kubochu squash - 3
Buttercup squash - 3
Tomatillo - so damn many
Tomatoes - scads (eaten fresh; cooked in galettes, tarts, salsa, and bruschetta; processed into pizza sauce and frozen)
Jalapeno - 8
Zucchini and yellow summer squash - more than it was possible to eat ourselves but we sure tried as galettes, grilled, frittered, and stuffed. Some got grated and frozen for use in meatloaf this winter. Oh, and much zucchini bread and double chocolate zucchini cake got baked (and eaten) too.
Cucumbers - enough to eat fresh, make two pints of dills, and share with Dad. Not many but what we got tasted great.
Then it was time to put the garden to bed for the winter. I decided to use the "Ruth Stout" method which basically means putting down thick layers of hay or straw or leaves or just about anything else compostable and then letting it lie there all winter. In the spring, you clear away the layer, plant the seeds or seedlings, tuck them in, and ignore them all summer. Now, the odds that I'll actually just leave the garden alone all next summer are right up there with winning the lottery so we'll just say that I put down a heavy layer of mulch and leave it at that.
The greatest thing about this was that we'd gone to my favorite local feed store to buy pellets and hay bales for the chicken coop and just happened to ask if they had any spoiled straw/hay that they'd like to get rid of; and they did! We got two truck loads of free hay and straw bales that I happily used to layer on both the main garden and the kitchen garden. Woot!
Chris has also been diligently working on the pit greenhouse. He'd gotten started on this quite a while ago, but then life happened and it took a backseat to, well, everything. But much progress has since been made.
The only part that existed prior to all his hard work was the tall back wall and the stairwell.
Actually, even the stairwell needed work as the many of the treads were missing. Where on earth huge slabs of stair tread could have gone is anyone's guess, but they were definitely not there.
He's actually gotten a lot more done - the new walls are nearly level with the original wall and top of stairs now. I'd show a photo but it's covered by at about a foot of snow. Yes, we're already getting lots of snow and it's definitely not melting off.
Hubbard squash - 3
Butternut squash - 8
Kubochu squash - 3
Buttercup squash - 3
Tomatillo - so damn many
Tomatoes - scads (eaten fresh; cooked in galettes, tarts, salsa, and bruschetta; processed into pizza sauce and frozen)
Jalapeno - 8
Zucchini and yellow summer squash - more than it was possible to eat ourselves but we sure tried as galettes, grilled, frittered, and stuffed. Some got grated and frozen for use in meatloaf this winter. Oh, and much zucchini bread and double chocolate zucchini cake got baked (and eaten) too.
Cucumbers - enough to eat fresh, make two pints of dills, and share with Dad. Not many but what we got tasted great.
Then it was time to put the garden to bed for the winter. I decided to use the "Ruth Stout" method which basically means putting down thick layers of hay or straw or leaves or just about anything else compostable and then letting it lie there all winter. In the spring, you clear away the layer, plant the seeds or seedlings, tuck them in, and ignore them all summer. Now, the odds that I'll actually just leave the garden alone all next summer are right up there with winning the lottery so we'll just say that I put down a heavy layer of mulch and leave it at that.
The greatest thing about this was that we'd gone to my favorite local feed store to buy pellets and hay bales for the chicken coop and just happened to ask if they had any spoiled straw/hay that they'd like to get rid of; and they did! We got two truck loads of free hay and straw bales that I happily used to layer on both the main garden and the kitchen garden. Woot!
 |
| Cooper and chickens helping tuck in the main garden |
 |
| The pit, wall rocks, and the coop in background |
 |
| Building walls |
 |
| Coming down the replaced treads |
 |
| Back wall is nearly 6 ft above ground level |
Still lots to do here but I figure I'll be able to use it by end of summer to do some late fall/early winter gardening. Greens! In October!
Tuesday, November 20, 2018
How the "pumpkin" bread turned out
Great, that's how. I did notice that the batter was a bit more liquid than when I use commercially canned pumpkin. And that carried over in how it baked - it took longer to cook all the way through, which meant the outside came disturbingly close to burning. It didn't, but it is tougher and more carmelized than I would have liked.
For the 11(!) bags of puree that I have in freezer right now, I'll just make sure I account for that in future recipes. For the pumpkin bread specifically, I'll use broader/shallower quick-bread pans rather than my standard loaf pans. Spreading out the batter should help it cook more evenly.
For the hubbard squash still to be processed, I'll roast it longer to get even more evaporation.
So, that's that. For anyone interested in the pumpkin bread recipe, it's from my recipe card file, which means its origins are a bit murky. As best I remember, it came from a co-worker in Louisiana who got it from a sorority sister in Maryland who got from...no one can remember. So, thanks to that original someone! It's a great recipe and actually gets better when you freeze the loaves.
Pumpkin Bread (makes 2 loaves)
3 cups sugar
15 oz can pumpkin
1 cup oil
4 eggs
2/3 cup cold water
3 1/2 cups flour
2 tsp baking soda
1 1/2 tsp salt
1 1/2 tsp ground cinnamon
1 tsp ground nutmeg
Preheat oven to 325 degrees.
Combine wet ingredients and stir well. Combine dry ingredients in small bowl then add all at once to wet. Stir well. Pour into two well greased loaf pans and bake for 90 minutes or until toothpick inserted in center comes out clean. Cool completely.
These freeze very well and seem to get even more moist when later thawed. Enjoy!
Monday, November 19, 2018
Utilizing the Garden Harvest - Hubbard Squash
I harvested three Hubbard Squash from the garden - two monsters and one that is only not a monster in comparison to the other two. Yesterday I decided it was time to process the first one.
 |
| This puppy weighed 24 pounds. 24! |
Splitting it was actually pretty easy as I'd cured the squash before storing and the shell was nice and hard. So a couple good whacks with the clever broke it into sections.
 |
| I didn't use a hatchet. |


 |
| Nice caramelization |
 |
| The three segments above became this |
 |
| Portioning the goo |
And in case you're interested, here are the stats:
Hubbard squash, unprocessed: 24 lbs (384 oz)
Puree: 180 oz or 12 "15oz cans"
Waste: 204 oz; shells 78 oz, innards 23 oz, balance water weight lost to evaporation
I was a bit surprised at how low the yield actually was. I didn't expect to lose half the squash's weight. I'll test those results when I process the other monster squash - it's about the same size as this one was.
Tuesday, August 28, 2018
The First Egg!
Red laid the first egg!
 |
| It's so itty! |
It's a tiny thing but good shell formation and shape. The girls turned 20 weeks last Sunday so we were expecting them to start producing soon. We've been carefully checking for squatting behavior and keeping an eye on the color of their combs. In fact, that's why Red is called "Red" - her comb turned red much earlier than any of the other hens.
It was a bit of an ordeal to get her to use the nest box rather than a dirt spot underneath an old pallet, but we were triumphant in the end. And so - the laying begins!
Tuesday, August 21, 2018
Garden update (only one tomato blushing)
The garden is going gangbusters. Here are the details (and I mean details, you might want to skip this post if you're not into garden specifics).
Plant issues and diseases:
Vine borers are the bane of my garden existence. I've had to perform surgery on every squash plant out there. I was doing awesome at catching the darn things while still small enough to easily find and remove right up until I went traveling for three days. Amazing how quickly a pest can take hold in that small amount of time. I think I've caught back up and only lost on summer squash plant, so not too bad.
Powdery mildew - I was keeping ahead of this by using a mixture of 4 cups water to 1/2 tablespoon white vinegar to spray the plants each morning. Then, you guessed it, travel interrupt and BOOM! white leaves when I returned. I've cut off the infected leaves, burned them (strangely satisfying), and resumed my spray routine and everything looks good again. (It should be noted that the travel was well worth any catch up I've had to do - post coming soon).
Green stink bugs - huh? Where did these things come from? We've never had them before so I have to assume the eggs arrived either in the new soil that we purchased this year or in the starts that we brought from up north. Either way, we've got them now. Fortunately they seem to prefer the sunflower plants to anything else in the garden so I'm using those as lures. Unfortunately my sunflowers are about 10 feet tall and the bugs like to munch at the very tops of the stalk. Still, better those than anything else in the garden.
Plants:
Yellow squash - so much squash! All of these plants are producing at rates that just amaze me. In fact, I'm getting so much that I'm harvesting young, small fruit so that they're more tender and the volume isn't so hard to use.
Zucchini - One plant is producing at a nice steady pace. And it's actually put down squiggly white roots along the main stem which helps save it if I miss a borer. The other two zuke plants are barely producing despite looking gorgeous.
Basil - crazy good. Will forever buy grocery store basil and plant it from now on.
Dill - awesome dill crop. If only my cukes had produced...
Cucumbers - meh. Turns out I had three different varieties: green pickling cukes and two types of white heirloom cucumbers. All taste great but aren't producing enough at one time to pickle easily. So I'm quick pickling what I have and will hope for a blow-out in September.
Winter squash - I sure hope I can figure out how to use all this stuff. I have three massive Hubbard squash with more growing, and multiples of kobacho, buttercup, and butternut.
Tomatoes - many, many green tomatoes. There is one showing the first blush of ripening. Hopefully this time next week I'll be awash in maters. Looks like I ended up with only beefsteaks, no paste tomatoes, no cherry tomatoes.
Tomatillos - going crazy but nothing ripe yet. They're so cute in their little green jackets.
Jalapeno - ate the first one yesterday and it was awesome. Great heat combined with flavor. Many more are forming. Fresh pico de gallo soon!
Cauliflower - they are supposed to head up, right? Gorgeous leaves, nothing forming in the middle. I think caterpillars are retarding growth and my experiment with diatomaceous earth was unsuccessful. I've purchased caterpillar spray for next season.
Kohlrabi - saved two from the voles.
Sunflowers - gorgeous, huge, and starting to head.
Cilantro - meh. Started seeds late hoping the plants would come in just in time for salsa season but they're barely growing. I have the worst time with cilantro!
The little kitchen garden is in desperate need of a redesign. The kale is doing well, as is the oregano, lemon thyme, and chives but everything else is sad. Not enough sun seems to be the issue. So I'll be moving landscape timbers and shifting it further west next year. I do have two volunteer cherry tomato plants that managed to set fruit but it's very green and I'm not sure they'll have time to ripen. I hope so. And I'll save some of the seed to actually plant up in the main garden next year. Obviously this is strong seed!
And now, since you've been so patient, here's a nice picture of Cooper enjoying the fire pit.
 |
| Wonder what she sees... |
Friday, August 10, 2018
The water spigot
I've been told I didn't do justice to the difficulties in creating the water spigot. I, of course, commented that it'd be easier to crow about if there were photos of the process...
But here goes - because it is really cool what Chris did to make this look like it'd always been up there.
 |
| The spigot |
The Pex needed to come out the bottom and run horizontally through the ground but he didn't want to add an elbow (they slow water flow and we have pressure issues this far up the hill as it is) so he carefully created a channel that would curve the Pex appropriately without putting undue pressure on it.
Then he joined the halves back together with a tight seam. Once it ages a bit it'll be pretty much invisible.
So that is the full story of crafting the water spigot. Thanks Honey!
So that is the full story of crafting the water spigot. Thanks Honey!
Wednesday, August 8, 2018
Generator shed
We installed a standby generator when we built the house and, as recommended, built a shelter for it. But since we were expending all our energy on silly things like indoor plumbing and cooking facilities, the cover was sort of quick & dirty. In other words, it was really ugly.
Well, Chris found the time this summer to build a much nicer shelter and it looks great.
 |
| Dry fit on the porch |
 |
| Figuring angles |
 |
| Assembling in place |
 |
| Zoom in for a look at that truss join! |
 |
| Plenty of room for snow shed |
 |
| Stained and roofed |
Monday, August 6, 2018
Garden update
The camp garden is doing great. I took these pictures on July 30th and despite sporadic rain the plants look fantastic.
I picked 18 ounces of basil leaves already; enough to make our entire winter supply of pesto. And the plants are already producing new leaves so we'll have plenty to use when the tomatoes finally start to ripen. Love Caprese salads!
I got most of my starts from a friend but there was a bit of confusion in the labeling. So I've got plants that I have no clue as to how to identify the produce. Especially on the squash plants.
I've been battling squash vine borers again this year. I've performed multiple surgeries on many vines and so far I've been able to save the plants. It's a losing battle though so I'm going to have to find an alternative. I did a bit of research and came across a recommendation for Safer Brand 5163 Caterpillar Killer. I'll try that next year. For now I just keep digging them out, powdering with diatomaceous earth, and burying the vines.
So many Hubbard squash! I've got six good sized ones and about six more little ones that may not have time to ripen. Last year Dad and I split one squash and both had enough for that night's meal, leftovers, and freezer stock so I'm going to be overrun with squash. I'm going to try this in a pie and see how it goes.
The mystery squash to the left of the photo hasn't set fruit yet so I have no idea what it could be. Given how late we are in the growing season I'm assuming I'll never know now. Also in this area is cucumber; but not normal cucumber, an heirloom white variety. They're small, spiny, and tasty.
Chris got the rain barrel hooked up. I'll set it up next year for a drip irrigation system.
My zucchini plants are huge. This is just one of them and the leaves are enormous. It's producing good quantities of fruit too.
The tomatoes are being difficult. They set fruit early but none of it has ripened. None.
I've been playing around with next year's garden layout already. I figure it's a good time to think about it while I've got perfect examples of how much room everything actually takes up.
As for harvests, we're getting enough summer squash out of these plants to make a dish every day plus share with Dad. Fortunately I've got a lot of squash recipes else we'd be really sick of it already. It's been a slow cucumber year but I've managed to put up a couple pints of dill pickles so far. The tomatillos are finally forming and I expect an excellent harvest there, and the jalapeño plant has one pepper already and lots of blossoms. I lost all but two kohlrabi to voles but those last two look great and I should be able to pick them this week.
I picked 18 ounces of basil leaves already; enough to make our entire winter supply of pesto. And the plants are already producing new leaves so we'll have plenty to use when the tomatoes finally start to ripen. Love Caprese salads!
 |
| After the basil harvest |
 |
| Dill, mystery squash, hubbard squash, yellow squash |
 |
| Sunflowers, tomatillo, cauliflower, jalapeño |
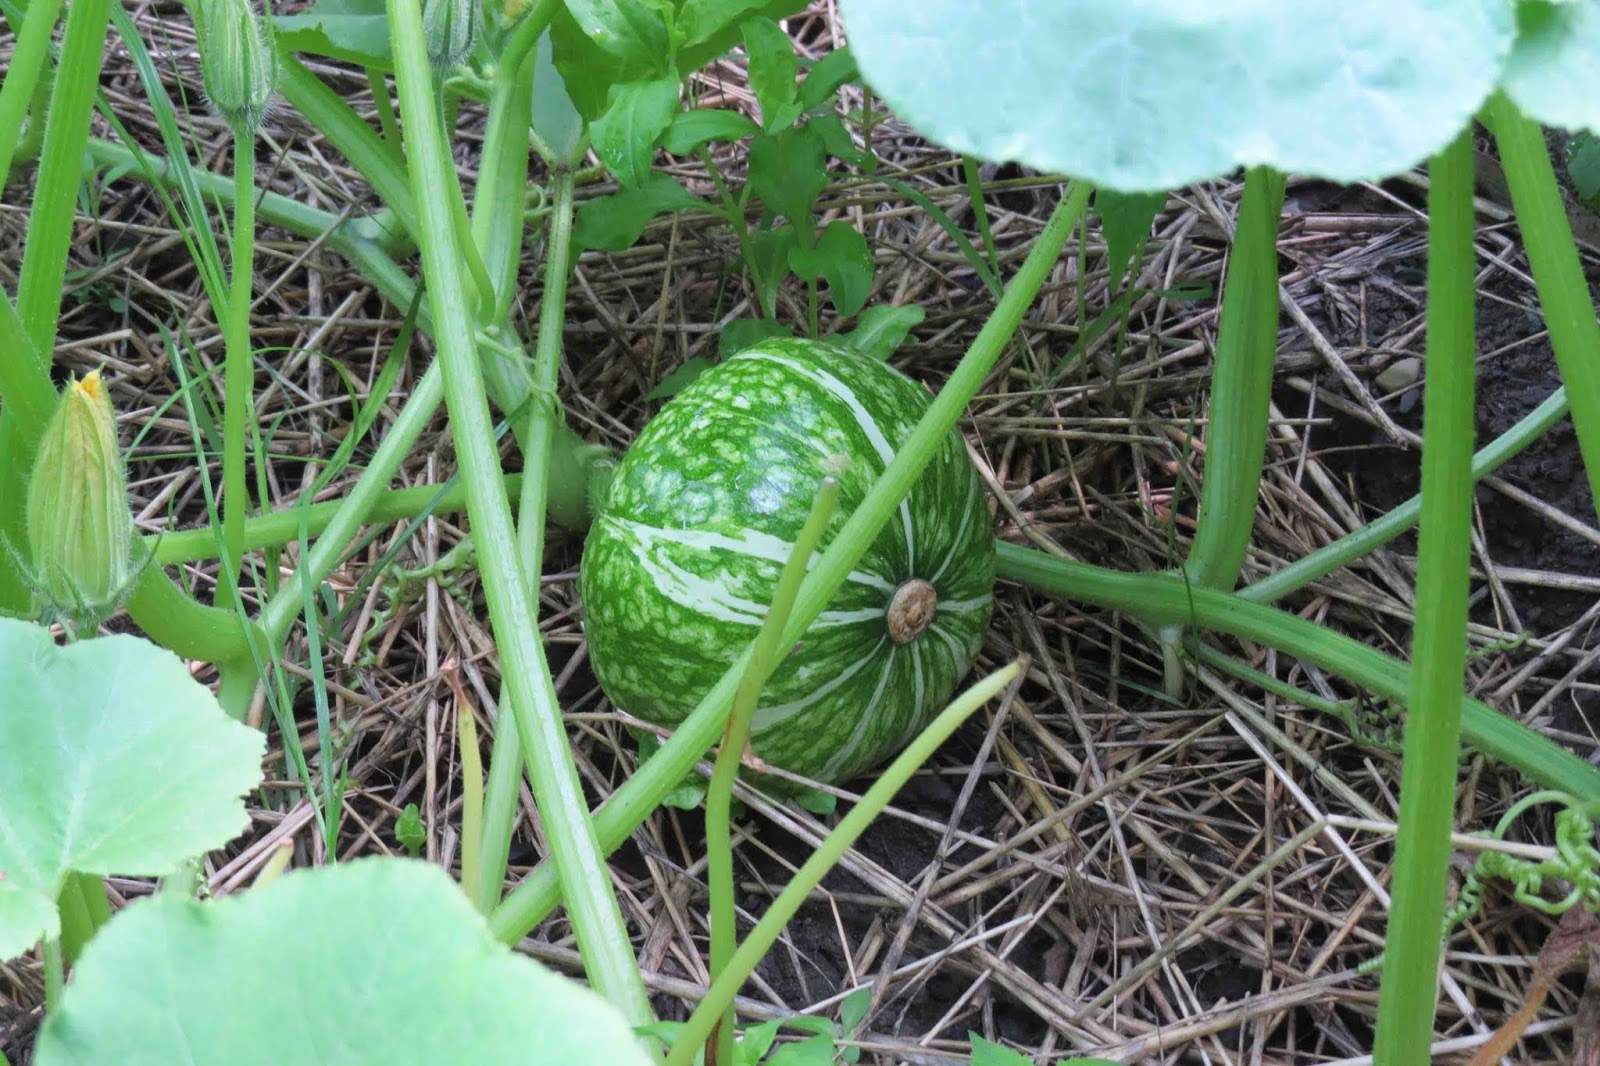 |
| Mystery squash - maybe buttercup? kobocha? |
 |
| My nemesis-squash vine borers |
 |
| Hubbard squash - one of many |
 |
| Zucchini, Yellow, Cucumber, and more mystery squash |
 |
| The new water barrel |
 |
| Huge zucchini leaves! |
 |
| So many green tomatoes |
 |
| Very healthy tomato plants |
As for harvests, we're getting enough summer squash out of these plants to make a dish every day plus share with Dad. Fortunately I've got a lot of squash recipes else we'd be really sick of it already. It's been a slow cucumber year but I've managed to put up a couple pints of dill pickles so far. The tomatillos are finally forming and I expect an excellent harvest there, and the jalapeño plant has one pepper already and lots of blossoms. I lost all but two kohlrabi to voles but those last two look great and I should be able to pick them this week.
Wednesday, July 18, 2018
Running water to the garden
I've been using hoses to run water up to the garden area but now that we've got it all spiffy looking we figured a more permanent solution was in order. Particularly a solution that would allow Chris to mow up there without having to worry about chopping hoses all to hell.
We bought some Pex tubing and stretched it up there so that it could relax.
 |
| Coils of Pex |
 |
| Choosing the spot |
 |
| Dropping pipe |
 |
| Water through the woods |
He used some old barn wood to create a cover for the line and it now looks like it's been there forever. We haven't done anything to cover the connection near the house yet but I expect it'll be something similar.
 |
| Awesome cover |
Saturday, July 14, 2018
Moving the Latrine
Way back in 2009 when we built the little camp on the property we also built a latrine.
 |
| Subtle, huh? |
This was not an outhouse but rather a private spot to use the composting toilet. Which means it didn't have a hole in the floor nor did it get gross with excrement. Which is fortunate because once we got indoor plumbing I repurposed it to a small garden shed.
Then in 2016 it got repurposed again when we turned it into a temporary chicken coop.
 |
| See the chicken? |
 |
| Sad and lonely |
This year solved both the location and the usage issues. Once the camp garden was all set up we decided to once again move the little building to a new location. It makes me nervous when we move this thing but Chris is a dab hand at tractor work so it went smoothly. The hardest part was keeping it level when going up the steep driveway hill.
 |
| Careful... |
 |
| Argh! Don't let it tip! |
 |
| Whew! |
 |
| I want it around the back... |
 |
| Yeah, in the corner closest to me. |
 |
| Um, it'll never make that swing... |
 |
| Setting foundation stones |
 |
| Wonderfully functional |
Subscribe to:
Posts (Atom)