Sunday, July 29, 2012

Insulating, back filling, and plumbing, oh my!

More progress has been made! The foundation walls were insulated and the chase for the incoming water line was completed before beginning to back fill the foundation.
Insulation and incoming water chase
During the backfilling a tamper is run every 8 inches in depth to make sure the ground is compacted before pouring the slab.

Getting closer to the top layer of fill
All the rocks were cleaned out of the area and final layer of clean fill was tamped down. Then the plumbing was started. Lots of planning involved in this stage to be sure you have the appropriate lines for shower, washer, toilets, etc.
Various plumbing lines
R-10 insulation is put down to insulate the slab and prevent the radiant heat from leaching into the ground.
Adding the ground insulation
And then a vapor barrier is added on top of the insulation. We used a product called Reflectix which is recommended for radiant floor heating systems as it has a top layer that reflects heat back up to the slab.
Taping the seams
As is typical when you're trying to get something outdoors accomplished, the weather changed from the near draught conditions that we've had all summer to rain. Steady rain that came down from around 6PM to 10AM each day. I decided that someone was trying to tell me that I should relax while on my vacation. We still managed to get an incredible amount accomplished during the dry moments and decided to just be grateful for the moisture during the wet ones.

Wednesday, July 25, 2012

Why it's not a Tiny House

I designed the floor plan of the house that we're building. I used Punch Pro design software and spent many pleasurable hours (over many years) trying first one layout then another. Different sizes of home, building styles, and floor layouts were tried and discarded before I finalized the current plan.

I then took those floor plans to our architect so that he could turn them into something that would not fall down around our ears. After all, I'm an accountant, not a builder. I didn't know codes or building requirements. What I did know is what I wanted in the home we were going to live in for many years to come.

The tiny house movement has been alive and well for many of the years in which I've been designing. And when we built the Nest we did so with economy of space in mind. It's interior room is 12'x12' and it has an 8' porch. With the loft space over the porch we've been perfectly comfortable in this small space while we worked on site prep for the main house.

And although we've occasionally played with the idea of moving into it, that wasn't realistic for us. It simply wasn't the way we wanted to live. We believe there are reasons to live in a larger space - now I'm not talking about a McMansion of 4,000 sq ft - but if you're going to live somewhere for a long time, if you're going to invest man-hours and money in building it, then you should make sure it satisfies your wants and desires. When I read about people in their tiny houses, I find myself wondering - how long will they be happy there? And I realize that, for me, the answer would be "not long".

The Beech House will be 1,760 sq ft. Certainly not huge, but not exactly tiny either. Within that square footage it will have a kitchen that will fit all of my family when we get together for Family Baking Day; a dream pantry my cooking and baking supplies as well as the canning that I do; a room for music equipment and instruments, art supplies and drafting tables, as well as the electronics that make life more fun. Are any of those things necessary? Nope.

But we wanted space for the way we live - which is why we'll have a covered porch that runs the entire length of the house as well as a screened upper deck over the attached garage. Indoor and outdoor living areas designed to satisfy not only the basics, but the way we truly live.

A tiny house? No - but the right size for us.

Saturday, July 21, 2012

Round Lake Antique Weekend

We spent the morning at the Round Lake Antique festival. Gorgeous day and lots of vendors came out to show off their wares. We had a mission - find heating grates to allow radiant heat to flow to the upstairs. I'd done a bit of research to establish price points and now we were on the hunt!

 Round Lake is full of gorgeous houses - some big, some small, all well decorated. We loved the tower on this one.

 Dad's shadow, me, Chris's shadow on the walk into town.

 They had lots of old linens. I love table cloths but didn't find any bargains this time.

Dad and me at a vendor with lots of kitchen stuff. Gorgeous cast iron pans! I've got a good selection already, so no money spent. Besides - the goal of the day was heating grates.

We found a set that had been painted white (ugh) and were marked way too high. But then, up ahead, what is that? Is it? Yes! Three grates leaning against a table. Note that there are no pictures of these as we were far too excited to remember to get out the camera. Two of the grates had a fleur de lis pattern and the other two had a geometric design. Of the geometrics, one was in good condition but the other was disassembled and had a few cracked pieces. But since I only need three grates, we were good to go. I'll be sure to post pictures of them soon.

Friday, July 20, 2012

Footers and foundation walls

Chris has been hard at work coordinating the footer and foundation wall pour.

Note my work site fashion sense
 The footers were poured last Friday and I got to check them out over the weekend. It was humid and foggy that day.
Fog rising off the footer trenches

Wall framing on the footer
They came out to frame the foundation walls Tuesday. A hot day to work in full sun.

Wall between garage and house
Chases needed to be placed in the correct spots so plumbing can move in and out as needed. Waste water out, grey water out, fresh water in, electric and propane piping in. Lots to think about before the walls are poured.
Plumbing chase

Cement!
 Amazing that trucks this big actually fit all the way around the home site. The dirty truck on the right was seriously tilted at times and we're still amazed it didn't tip over. Cement truck drivers are fearless!
Cement in its rightful place
 The wooden dam is there so they can lower the wall under the door.
The frames came off just a day after the pour
 And here you can see the lower spot where the front doors will be. We're putting in hinged patio doors with full glass. So beautiful! We went with Andersen windows and doors as we liked the quality and the price.
Doors have a drop in the wall for framing

Insulation on the interior of the wall
It's important to insulate the slab (and required by code). We're putting in a radiant floor heating system so it was critical to reduce thermal loss as much as possible. Once the walls are back filled and the slab underlayment is in place, we'll insulate the slab and then do the pour. We should be laying out the Pex tubing next week!

Wednesday, July 18, 2012

Decorating the Nest

I'm not the artistic one in the family. That would be my sister, who is a gifted artist. I do manage to have fun with paints and various crafts though. Decorating the camp has been fun and I've done my best to make it functional as well as cute.

Inside the Nest
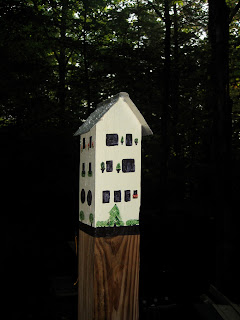
The latest decorating scheme revolves around the porch supports on the Nest. We have a bird theme going (okay, that was obvious) and when we put in the support posts Chris cut the tops so that I could eventually paint them to look like bird houses. Well, I finally got one post done. How cute is that???

The side facing the Nest

The front
We cut out some metal roofing to put on the top.


Back post primed and waiting for decoration

Love the shape of the roof

This side isn't as visible - but still cute

Is it artistic or just bad lighting?

Saturday, July 14, 2012

The old barn foundation

Conquered!
For those wondering what the "old barn foundation" looked like - that's it behind me. It looked much like a rock wall except rectangular and really deep at parts. Hard to tell in the photo, but one section of the foundation top was at ground level, while another three-sided section had a three foot drop-off. The best description is in a modern barn where you have a low section that you pull the tractor or wagon into and it backs up against the floor of the barn for easy loading and unloading. Gee, that'd be a loading dock or bay, wouldn't it? See this is what happens when you type and think at the same time - you get a big rambling at times. The big rock I'm standing on is in that lower bay area.

We really wanted to get these walls disassembled before bringing in the big excavator because we wanted to sort the rock for future projects. Worked well even if it did take quite a while.

While pulling it apart we found some nifty stuff too - old bottles, metal bits from farm equipment, four scythe blades (four! how many did they need?), and many snakes. Now, I like snakes. Used to have them as pets even. But it's more than a bit startling to lift up a rock and find one under it - and to know that you cannot drop the rock or you'll kill it. No killing of snakes! They eat the #%$!@ mice that keep getting in the camp. So we took the time to keep moving them out of the dig area. And the next day, we'd lift up a rock and YOW! there it would be again. Nothing like a three foot snake to brighten your day.

Wednesday, July 11, 2012

Did I mention we have rocks?

Future rock garden

Two of these rocks will remain here (the one I'm sitting on and the one directly behind it). They are to the right side of the porch view so won't be too in-your-face. I'm going to mound up soil and fill in with hostas and flowering ground cover. The rock to the left has already been moved to a more pleasing spot and it too will get flower treatment. It's sunnier in its spot though so I'll be able to do lilies and other sun flowers.

Standing in the footer trench
Chris is in one footer trench, taking the picture of me in the other. Everything is dug out now and the cement guys are coming Friday to pour the footers.

Excavation dirt
Look at that sandy soil! We mainly have forest loam but the dirt in the foundation site has been surprisingly sandy with a hard clay base. Some big rocks as noted above but mainly Adirondack clinkers of a couple feet diameter. We're building the house where an old barn foundation stood. We kind of assumed that whoever built the barn there did so for a reason. Good drainage. Firm soil (the barn foundation hadn't really shifted at all).

For those interested, we disassembled the barn foundation and saved the rocks for use in future projects.  As we were doing the disassembly is when we decided it was a barn not a house - we've found lots of equipment related metal bits and some cool old bottles. Need to do some dating of the finds once we have time to get into the research.

We took our plans to Curtis Lumber to get the materials estimate. They're backed up with the prime summer building season (who says housing starts are down?) so we may have a materials delay. But we still need to install the radiant floor tubing before pouring the slab so we have some time yet. And it won't hurt anything if the slab sits for a little while before the framing starts. Although since the cement is going to be our finished floor we'll likely need to do something to keep it safe and clean. Huh, have to give that some thought.

Sunday, July 8, 2012

Digging the Foundation

We've gone from this:
The site in summer 2011
 to this:
The site in summer of 2012
Chris was doing a great job of clearing and digging the site but after encountering boulders like this one, he decided it was time to bring in the big equipment.
Now that's a big rock
Our neighbors T&S had recently built their house and recommended their excavation team. Skip and his son came out and got started right away. So far they've come up with three additional boulders twice the size of this one (plus many smaller rocks). I've got one heck of a rock garden in my future.